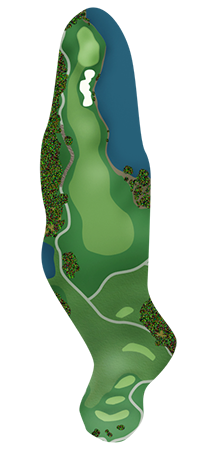
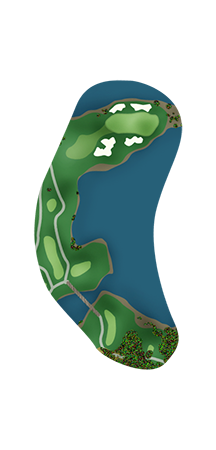
Take in the scenery before you begin your round on the Judge. Some feel that Hole No. 1 is the signature hole of the entire Trail. This difficult par-4 is straight downhill off the tee. A bunker protects the front of the green and water lines the right side.

Water guards the right side of Hole No. 2, a dogleg-right par-4. A large tree sits in the middle of the fairway and comes into play for long ball hitters off the tee. The green is protected by a bunker, so the bailout area is short and left of the green.

The large, well-bunkered and undulating green on the par-3 third hole challenges the best golfers. If the flag is on the left side of the green, make sure you have enough club to avoid a steep drop-off in front of the green.

The par-5 fourth hole does not need hazards to make it difficult, but it would not be the Judge if water and bunkers did not come into play! Avoid the water from the tee and lay up short of the water and bunkers guarding the small green.
A big drive over the fairway bunker will leave a wedge approach to the par-4 fifth hole. The safe play is to hit a fairway wood on the tee, leaving a mid- to long-iron to the green. The slightly uphill approach shot with water lurking on the right side is dangerous.

The intimidating tee shot to the par-3 sixth hole is all carry. There is no place to bailout on this island green, which is also the largest green on the course. Trust the yardage, but do not forget to factor in the wind as it will wreak havoc with your tee shot.
Hole No. 7 is a three-shot hole to reach the green. Your tee shot must avoid a bunker to the left and water short and right to find the fairway. The layup to a very narrow landing area must be accurate to leave a short approach to a wide and shallow green.

Hole No. 8 provides relief from the water, but do not let that fool you as it is necessary to find the fairway off the tee. Pot bunkers guard both sides of the fairway and another bunker sits about 90 yards in front of the green in the middle of the fairway.

The par-4 ninth hole will play shorter than its yardage if your tee shot is struck well enough to find a downhill-sloping fairway. The green sits above the fairway and is protected in front by two large bunkers.
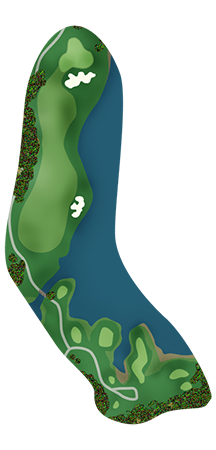
One of the longest holes on the Trail, the par-5 tenth hole is a monster at 711 yards from the tips. Hole No. 10 features an abundance of trees and bunkers, so tee it up and let it fly off the tee. The approach shot must be accurate to reach a small green.

Choose which side of the fairway you want to play to off the tee. Going down the right-hand side is safer, but will leave a worse angle to the pin than an approach shot from the left side of the fairway. A bunker protects the right side of the green.

Hole No. 12 is another par-3 with all carry over water and no room for error off the tee. A bridge at the edge of the swamp connects the tees to the green, giving you a good view of the natural beauty of the backwaters of the Alabama River.

The short par-4 thirteenth hole requires precision from the tee to avoid fairway bunkers down the right side of the hole. The approach is to a small green protected by a large bunker short and left. If you miss the green, the right side offers the best chance at a par.

Hole No. 14 is a straightforward par-4 that demands two good shots to reach the green. The ample landing area is a good place to take a big swing with a driver, but be careful not to stray from the fairway. The long approach is to a small, elevated green.

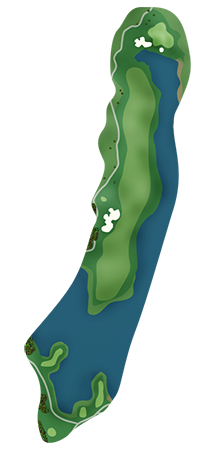
Hole No. 15 is a reachable par-5 for long hitters. A good drive will leave a fairway wood to a shallow, well-protected green. Those who lay up should avoid the tall grass to the right of the fairway. An extra club is required on the approach to reach the elevated green.
Hole No. 16 is the final par-3 on the Judge. The water hazard surrounding the green makes club selection from the tee critical. The green is exposed to the wind and, depending on the direction of the wind, might mean having to aim your tee shot to the right of the green.

Accuracy off the tee to the narrow landing area on the par-4 seventeenth is a must. Water and a small green can make what seems like an easy par quickly become a bogey or worse. A large bunker guards the front-left of the green.
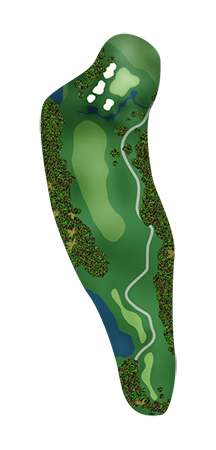
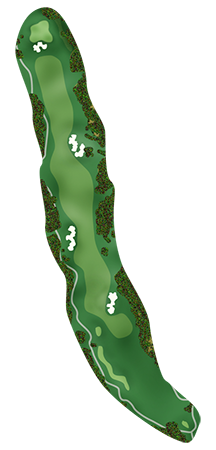
Hole No. 18 is all about precision. A drive to the left side of the fairway on this uphill dogleg right will open the green to a relatively easy approach. Extra club is needed to find the elevated green protected by bunkers and water.